The Zones of the Weld
, , and — three zones, three structures
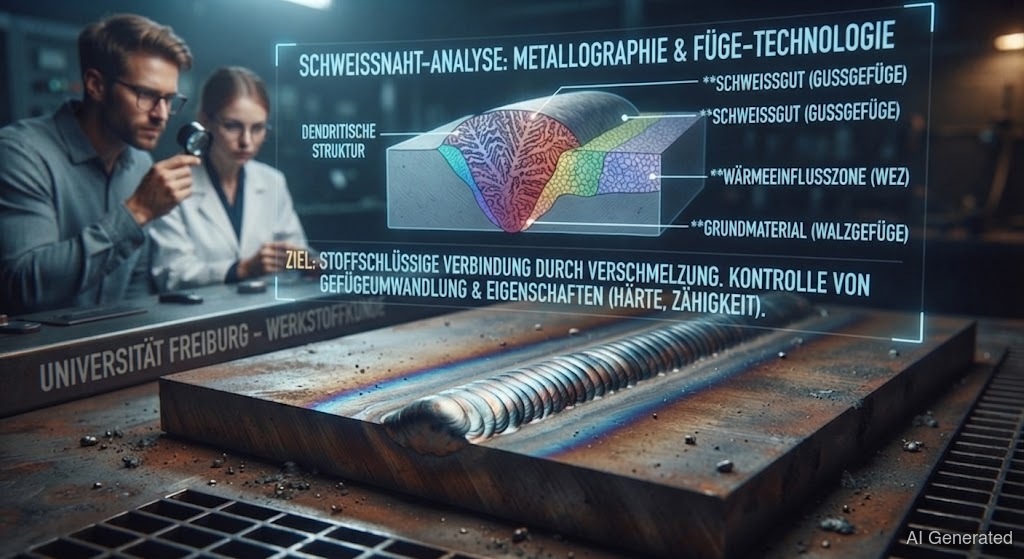 AI generated
A weld is never homogeneous. It consists of three zones: the melted , the heated (), and the unaffected . The is almost always the weak point — here the grain coarsens, here forms, here welds crack. If you know the zones, you test at the right place.
When you look at a weld, you see one metal. In reality, it's three different zones, each with its own structure and weakness. Only if you can tell them apart do you understand where a weld really fails.
Zone 1: the . This is the melted area made up of and . It has a typical cast structure — coarse, columnar grains growing toward the center with in the middle. You control its properties via the filler (see filler metal calculator).
Zone 2: the (). This is the right next to the weld that didn't melt but got heated a lot — depending on the distance from the weld, between 500 °C and over 1100 °C. The real drama happens in the :
• Coarse-grain zone (close to the fusion line, above 1100 °C): The grain has grown massively. Coarse grain is harder, more brittle, and more prone to cracking — this is where is most likely to form during rapid cooling.
• Fine-grain zone (around 900 °C): The steel has been re-transformed and reformed as fine grain — often the best, toughest zone.
• Tempering/softening zone (below 723 °C): For quenched and tempered steels, the tempering here is annealed and the steel becomes softer than the rest.
Zone 3: the unaffected . It keeps its original properties.
The is almost always the weak point of the joint — not the weld itself. Three dangers lurk there:
1. due to . High-carbon and high-strength steels form glass-hard in the coarse-grain zone → . Countermeasure: and controlled cooling.
2. Grain coarsening. The more heat, the coarser the grain, the more brittle. Countermeasure: limit heat input, don't stay in one spot longer than necessary.
3. Softening. For cold-worked or quenched and tempered materials, strength drops in the . You can only solve this via material selection or post-treatment.
That's why is always done across all three zones — , , . The maximum hardness value in the is a key acceptance criterion, not the of the weld center.